There is a new preview feature for Model-Driven Apps available: Customize app commands (preview) 🎉 If you are familiar with Scott Durow’s Ribbon Workbench then you will be familiar with the concept of modifying your apps ribbon menu or how Microsoft calls it nowadays - the command bar:
Command bars are at the core of every model-driven app and appear in many different locations. Commands are arranged in relation to other commands and are associated with a command bar location. The group of commands associated with a specific location make up a command bar.

It allows you to edit different command bars throughout your apps and - this is the cool part - all in the modern maker experience! 👌 No external tool and manual re-imports are needed anymore.
But be aware, it’s a 🚨 PREVIEW FEATURE 🚨 at the moment, meaning not everything is supported at the moment and there might be bugs. For more details check the known limitations.
🏃♀️ How to get started
You can access the new command designer at the moment only when you’re editing a model-driven app in the new preview mode (also called “modern app designer”):

The same general warning regarding preview features as above is also valid here: Not everything is supported and there might be bugs. But since we’re only using it to access the command designer we should be fine 👍 One thing that might pop up is this message after doing changes in command designer or the modern app designer in general. You can usually get rid of it if you publish all your customizations again.

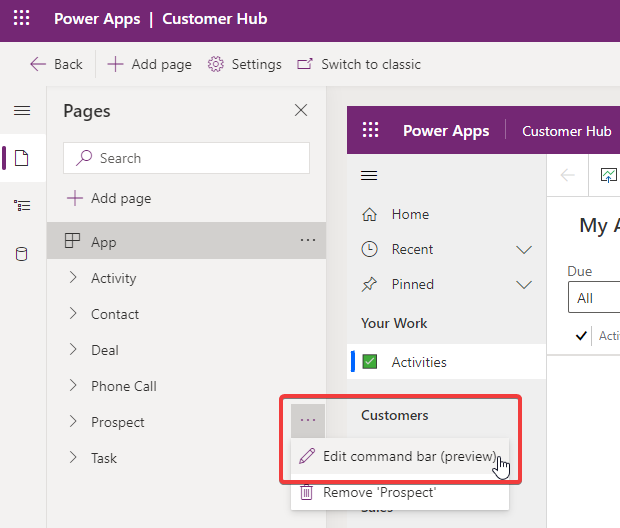
Inside the modern app designer, you find the command designer when you click on the buttons next to a table.
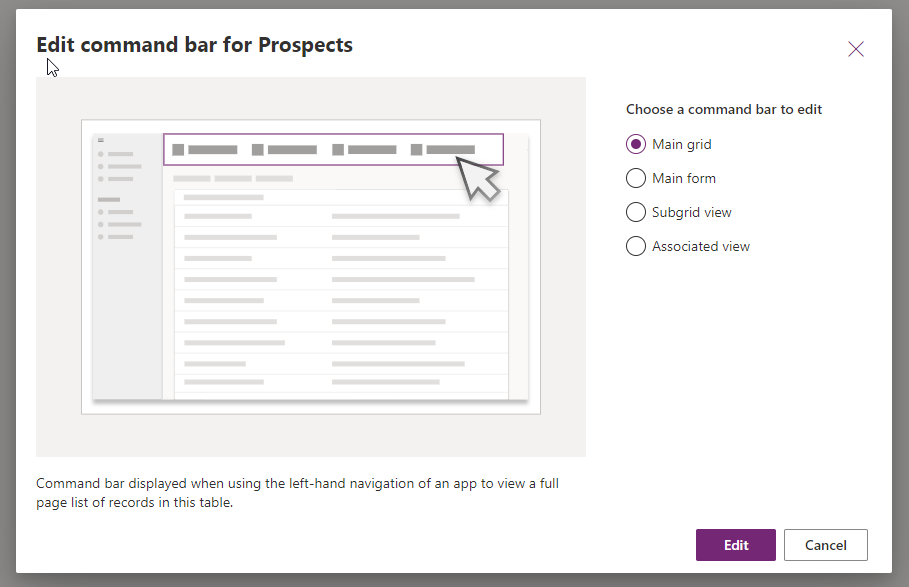
A new window opens where you have to select as a first step which command bar of the selected table you want to customize. The following options are available at the moment:
- Main grid -> Commands available the list view
- Main from -> Commands available when a single record is open in a form
- Subgrid view -> Commands available when a view is displayed on a form
- Associated view -> Commands available when a view is open from a form using the “Related” navigation
Kudos to Microsoft for great UX, it will also show you a picture to visualize which command bar is meant 🏆 For more details on the different types check out the Microsoft documentation Command bar locations.
➕ Add a command
Let’s start by adding a command. Why adding? Because that is the only supported action at the moment. You can’t modify or remove the “legacy” commands, which have not been added using the new command designer. This is a limitation of the preview in the fullness of time we will get more features 👍
In my case, I am building a custom app that should support a very simple lead process. I’m not using Dynamics 365 here, so I already created a table “Prospect” to which I now want to add actions to qualify or disqualify it.
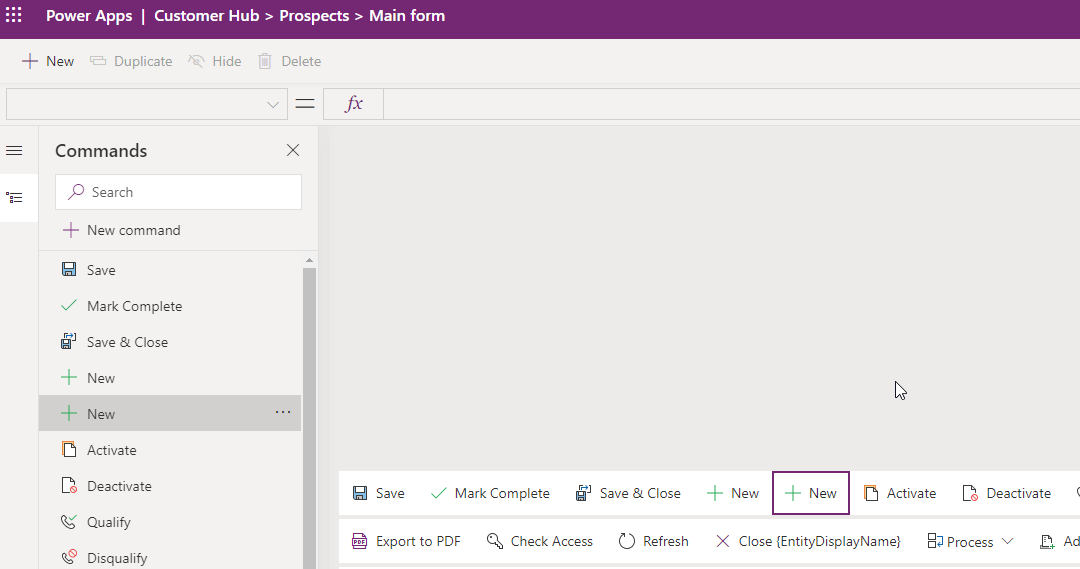
After you select which command bar you want to modify you get to the designer screen where you see all commands there are there at the moment. As mentioned before you can’t modify already existing ones. But using the “+ New Command Button” you can add additional ones.
In my opinion, the greatest feature of the new command designer is the possibility to not only edit the button by using JavaScript but also PowerFx 🤯 Especially for low-code / no-code makers, this is huge since JavaScript is not the easiest to get started with or to debug. Also a huge step forward in converging different app types and the languages needed to create them 🎉
In this first post, we will start with the “Disqualify” command. It should set the Prospect record to inactive and therefore should only be visible to the user when the record is active. For that, we will modify the command properties “Action” and “Visibility”.
💥 Action
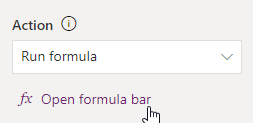
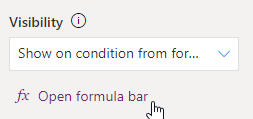
For the Action property, we select “Run Formula” to be able to use PowerFx. When clicking on “Open formula bar” we can start editing.
We can now use all* functions which we can use in Canvas apps. Well not all at the moment, but most! Check out Using PowerFx with commands to get more details for the documentation. This is also an area that will probably change a lot during the preview.
The most important part is the new Self.Selected property, which gives you the context of the selected record. If you are the Main Form command (like in my example) there is always exactly one record selected, in all the other command bars it might be zero, one, or multiple. Make sure to reflect that in your commands ☝
In my case I want the “Disqualify” command to update the current record and set its status to inactive and the status reason to disqualified. For that, I will use the Patch function of PowerFx. The first parameter is the table I want to update (“Prospect”) and the second parameter which record I want to update. Here I’m using the Self.Selected.Item to get the current record. In this command there is exactly one record because I’m on the Main form. The third parameter is all the fields that should be updated.
Patch(Prospects, Self.Selected.Item, {Status: 'Status (Prospects)'.Inactive, 'Status Reason': 'Status Reason (Prospects)'.'⛔ Disqualified'} );
Done! 🎉 For me that is a lot easier to write than JavaScript because except for the new Self.Selected property it is exactly the code I would have written in a Canvas app.
🔍 Visibility
For the Visibility property, I’m going to select “Show on condition from formula” to be able to write a PowerFx formula again. It has to be a formula that resolves to either “true” or “false”.
Normally I would put a simple formula checking if the value of the field “Status” equals “Active” but at the moment Dataverse option sets are not supported 🙁 So the following formula does not work. Be aware: It will not give you an error in the designer but it won’t work in your app.
Self.Selected.Item.Status = 'Status (Prospects)'.Active
When researching this error I discovered Jukka Niiranen’s blog post where he is describing the same behavior and a workaround for activity tables and a whole lot more insights in this topic, make sure to check it out 👉 Reopen tasks with Power Fx & custom command bar button.
On my custom table I needed a different solution and discovered that you can convert the Dataverse option set to text using the Text() function and do the comparison:
Text(Self.Selected.Item.Status) = "Active"
🚨 Be aware: This only works if your app only has one language, otherwise you need to also include all the translations here. So not a perfect workaround, but I’m sure Microsoft will fix this soon either way, for me it was good enough for a temporary fix 🙂
Here is the result, the command is there, after clicking it the current record becomes inactive and the command disappears 🎉

👉 Next steps
Try it out for yourself! I think this is pretty awesome because it lowers the bar for command customizations quite a bit. To be honest, before this I tried to avoid them because I had to use an external tool and JavaScript, no the limit is the sky. And what the preview currently allows 😉
I will upload the second part very soon, where I will build a more advanced command!