Embed Canvas apps in Outlook
Canvas Apps provide an awesome way of presenting tailored UIs to customers in order to enable them to solve their problems in the best possible way. However, a lot of users still love their Outlook client and seem to spend most of their time writing mails in it. Power Apps already provides a built-in Outlook Add-in to get Model-Driven Apps running in Outlook, but there is no such way for Canvas Apps. Wouldn’t it be great to have more options here? 🤔Like embedding Canvas apps directly in Outlook to unlock all options.
With this series I want to show you how you can achieve this 🥳
🙂 What do you get Out-Of-the-Box?
As I mentioned above, if you have worked with Dynamics 365, you might have come across the Dynamics 365 App for Outlook. This is a great standard app by Microsoft which enables you to use your CRM directly from Outlook. It comes pre-installed with Dynamics 365 for Sales, but you can also get it from AppSource.

These features make this app awesome 🔥
- Works on all clients: Desktop, Web, Mobile
- Embedded in mails & meetings. Additional functions for contact sync
- Is customizable because it is a normal Model Driven App
- Enables you to fully navigate your system
So, before you jump into creating custom integrations with Canvas apps always think about if not this app already fulfills your needs.
🚀 What does our goal look like?
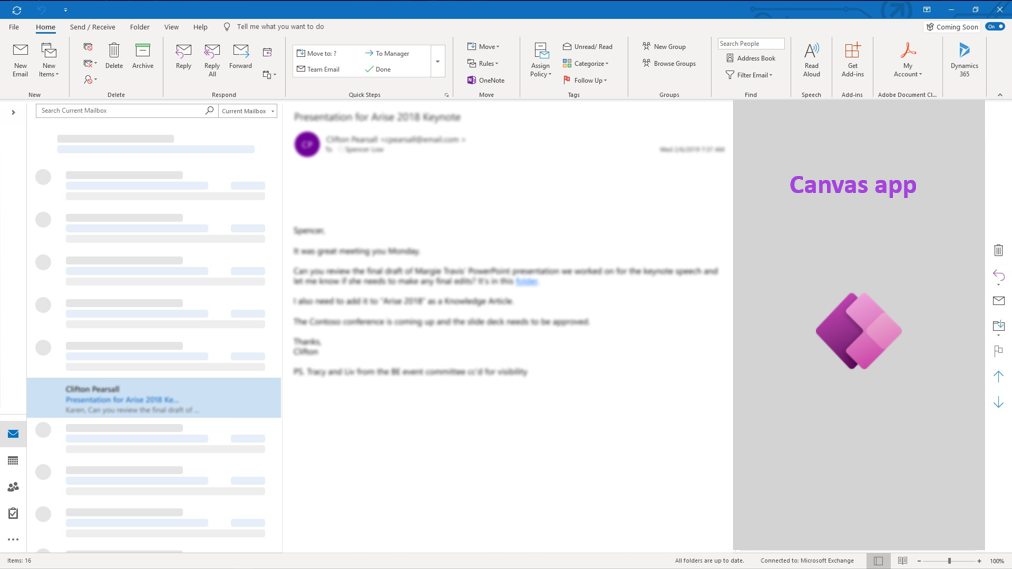
In this series we will try to emulate the look of the default Dynamics 365 App for Outlook. But instead of the Model-Driven have a canvas app shown. Of course, it should also be context-aware, that means it should have access to all mail properties. We can achieve this by creating an Office 365 add-in hosting the Canvas app in an iFrame. It will look like this:

The gray area is all canvas app where you can implement your custom UI / UX. If you’re like me and not in fact an Office 365 add-in developer you will appreciate the main goal of this approach: Minimize logic and UI within the Office add-in, let the Canvas app do the heavy lifting 😎
🔧 Requirements
For this series I will use the following tools to develop the Office 365 add-in:
- Visual Studio 2019 with installed Office Developer Tools (only available on Windows)
- Microsoft 365 Development tenant to play around with
- Get Power Apps Community Plan within this tenant
- OR: Within this tenant start a PowerApps trial
📢 Next steps
Now we have our development environments set up, in the next post we will look into setting up the Office add-in to host our canvas app 👌
Check out the next step here Canvas in Outlook 🎨📫 Part 2 - Set up Office Add-in
You find all details about the series in this overview post Canvas in Outlook 🎨📫